people.kernel.org

Reader

Read the latest posts from people.kernel.org.

from paulmck

Recently, a formal-verification researcher gave the expected verdict on software: “It is surprising that any software works!” I could not resist replying “You should be surprised that you work.” The researcher muttered something about evolution.

And in fact it has been observed that “Linux is evolution, not intelligent design”. From this viewpoint, review, testing, and other validation processes provide the Darwinian fitness function, eliminating unfit mutations from the “gene pool”. Which is good reason to continue working to improve these validation processes.

But there is another implication of this viewpoint. The patches that we developers sweat so hard over are nothing more or less than the software counterpart of random mutations.

But don't take my word for it. Ask your compiler!

 
Read more...

from Benson Leung

This issue came up recently for a high profile new gadget that has made the transition from Micro-USB to USB-C in its latest version, the Raspberry Pi 4. See the excellent blog post by Tyler (aka scorpia): https://www.scorpia.co.uk/2019/06/28/pi4-not-working-with-some-chargers-or-why-you-need-two-cc-resistors/

The short summary is that bad things (no charging) happens if the CC1 and CC2 pins are shorted together anywhere in a USB-C system that is not an audio accessory. When combined with more capable cables (handling SuperSpeed data, or 5A power) this configuration will cause compliant chargers to provide 0V instead of 5V to the Pi.

The Raspberry Pi folks made a very common USB-C hardware design mistake that I have personally encountered dozens of times in prototype hardware and in real gear that was sold to consumers.

What this unique about this case is that Raspberry Pi has posted schematics (thanks open hardware!) of their board that very clearly show the error.

Image

Excerpt from the reduced Pi4 Model B schematics, from https://www.scorpia.co.uk/wp-content/uploads/2019/06/image-300x292.png

Both of the CC pins in the Pi4 schematic above are tied together on one end of resistor R79, which is a 5.1 kΩ pulldown.

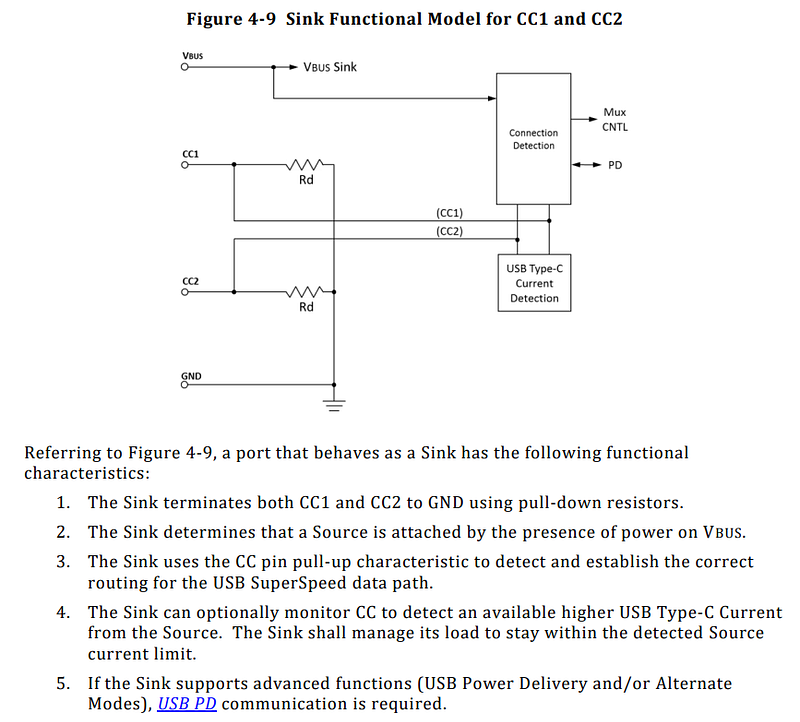
Contrast that to what the USB Type-C Specification mandates must be done in this case.

Image

USB Type-C's Sink Functional Model for CC1 and CC2, from USB Type-C Specification 1.4, Section 4.5.1.3.2

Each CC gets its own distinct Rd (5.1 kΩ), and it is important that they are distinct.

The Raspberry Pi team made two critical mistakes here. The first is that they designed this circuit themselves, perhaps trying to do something clever with current level detection, but failing to do it right. Instead of trying to come up with some clever circuit, hardware designers should simply copy the figure from the USB-C Spec exactly. The Figure 4–9 I posted above isn't simply a rough guideline of one way of making a USB-C receptacle. It's actually normative, meaning mandatory, required by the spec in order to call your system a compliant USB-C power sink. Just copy it.

The second mistake is that they didn't actually test their Pi4 design with advanced cables. I get it, the USB-C cable situation is confusing and messy, and I've covered it in detail here that there are numerous different cables. However, cables with e-marker chips (the kind that would cause problems with Pi4's mistake) are not that uncommon. Every single Apple MacBook since 2016 has shipped with a cable with an e-marker chip. The fact that no QA team inside of Raspberry Pi's organization caught this bug indicates they only tested with one kind (the simplest) of USB-C cable.

Raspberry Pi, you can do better. I urge you to correct your design as soon as you can so you can be USB-C compliant.

 
Read more...

from Christian Brauner

Introduction (CVE-2019-5736)

Today, Monday, 2019-02-11, 14:00:00 CET CVE-2019-5736 was released:

The vulnerability allows a malicious container to (with minimal user interaction) overwrite the host runc binary and thus gain root-level code execution on the host. The level of user interaction is being able to run any command (it doesn't matter if the command is not attacker-controlled) as root within a container in either of these contexts:

  • Creating a new container using an attacker-controlled image.
  • Attaching (docker exec) into an existing container which the attacker had previous write access to.

I've been working on a fix for this issue over the last couple of weeks together with Aleksa a friend of mine and maintainer of runC. When he notified me about the issue in runC we tried to come up with an exploit for LXC as well and though harder it is doable. I was interested in the issue for technical reasons and figuring out how to reliably fix it was quite fun (with a proper dose of pure hatred). It also caused me to finally write down some personal thoughts I had for a long time about how we are running containers.

What are Privileged Containers?

At a first glance this is a question that is probably trivial to anyone who has a decent low-level understanding of containers. Maybe even most users by now will know what a privileged container is. A first pass at defining it would be to say that a privileged container is a container that is owned by root. Looking closer this seems an insufficient definition. What about containers using user namespaces that are started as root? It seems we need to distinguish between what ids a container is running with. So we could say a privileged container is a container that is running as root. However, this is still wrong. Because “running as root” can either be seen as meaning “running as root as seen from the outside” or “running as root from the inside” where “outside” means “as seen from a task outside the container” and “inside” means “as seen from a task inside the container”.

What we really mean by a privileged container is a container where the semantics for id 0 are the same inside and outside of the container ceteris paribus. I say “ceteris paribus” because using LSMs, seccomp or any other security mechanism will not cause a change in the meaning of id 0 inside and outside the container. For example, a breakout caused by a bug in the runtime implementation will give you root access on the host.

An unprivileged container then simply is any container in which the semantics for id 0 inside the container are different from id 0 outside the container. For example, a breakout caused by a bug in the runtime implementation will not give you root access on the host by default. This should only be possible if the kernel's user namespace implementation has a bug.

The reason why I like to define privileged containers this way is that it also lets us handle edge cases. Specifically, the case where a container is using a user namespace but a hole is punched into the idmapping at id 0 aka where id 0 is mapped through. Consider a container that uses the following idmappings:

id: 0 100000 100000

This instructs the kernel to setup the following mapping:

id: container_id(0) -> host_id(100000)
id: container_id(1) -> host_id(100001)
id: container_id(2) -> host_id(100002)
.
.
.

container_id(100000) -> host_id(200000)

With this mapping it's evident that container_id(0) != host_id(0). But now consider the following mapping:

id: 0 0 1
id: 1 100001 99999

This instructs the kernel to setup the following mapping:

id: container_id(0) -> host_id(0)
id: container_id(1) -> host_id(100001)
id: container_id(2) -> host_id(100002)
.
.
.

container_id(99999) -> host_id(199999)

In contrast to the first example this has the consequence that container_id(0) == host_id(0). I would argue that any container that at least punches a hole for id 0 into its idmapping up to specifying an identity mapping is to be considered a privileged container.

As a sidenote, Docker containers run as privileged containers by default. There is usually some confusion where people think because they do not use the --privileged flag that Docker containers run unprivileged. This is wrong. What the --privileged flag does is to give you even more permissions by e.g. not dropping (specific or even any) capabilities. One could say that such containers are almost “super-privileged”.

The Trouble with Privileged Containers

The problem I see with privileged containers is essentially captured by LXC's and LXD's upstream security position which we have held since at least 2015 but probably even earlier. I'm quoting from our notes about privileged containers:

Privileged containers are defined as any container where the container uid 0 is mapped to the host's uid 0. In such containers, protection of the host and prevention of escape is entirely done through Mandatory Access Control (apparmor, selinux), seccomp filters, dropping of capabilities and namespaces.

Those technologies combined will typically prevent any accidental damage of the host, where damage is defined as things like reconfiguring host hardware, reconfiguring the host kernel or accessing the host filesystem.

LXC upstream's position is that those containers aren't and cannot be root-safe.

They are still valuable in an environment where you are running trusted workloads or where no untrusted task is running as root in the container.

We are aware of a number of exploits which will let you escape such containers and get full root privileges on the host. Some of those exploits can be trivially blocked and so we do update our different policies once made aware of them. Some others aren't blockable as they would require blocking so many core features that the average container would become completely unusable.

[...]

As privileged containers are considered unsafe, we typically will not consider new container escape exploits to be security issues worthy of a CVE and quick fix. We will however try to mitigate those issues so that accidental damage to the host is prevented.

LXC's upstream position for a long time has been that privileged containers are not and cannot be root safe. For something to be considered root safe it should be safe to hand root access to third parties or tasks.

Running Untrusted Workloads in Privileged Containers

is insane. That's about everything that this paragraph should contain. The fact that the semantics for id 0 inside and outside the container are identical entails that any meaningful container escape will have the attacker gain root on the host.

CVE-2019-5736 Is a Very Very Very Bad Privilege Escalation to Host Root

CVE-2019-5736 is an excellent illustration of such an attack. Think about it: a process running inside a privileged container can rather trivially corrupt the binary that is used to attach to the container. This allows an attacker to create a custom ELF binary on the host. That binary could do anything it wants:

  • could just be a binary that calls poweroff
  • could be a binary that spawns a root shell
  • could be a binary that kills other containers when called again to attach
  • could be suid cat
  • .
  • .
  • .

The attack vector is actually slightly worse for runC due to its architecture. Since runC exits after spawning the container it can also be attacked through a malicious container image. Which is super bad given that a lot of container workload workflows rely on downloading images from the web.

LXC cannot be attacked through a malicious image since the monitor process (a singleton per-container) never exits during the containers life cycle. Since the kernel does not allow modifications to running binaries it is not possible for the attacker to corrupt it. When the container is shutdown or killed the attacking task will be killed before it can do any harm. Only when the last process running inside the container has exited will the monitor itself exit. This has the consequence, that if you run privileged OCI containers via our oci template with LXC your are not vulnerable to malicious images. Only the vector through the attaching binary still applies.

The Lie that Privileged Containers can be safe

Aside from mostly working on the Kernel I'm also a maintainer of LXC and LXD alongside Stéphane Graber. We are responsible for LXC – the low-level container runtime – and LXD – the container management daemon using LXC. We have made a very conscious decision to consider privileged containers not root safe. Two main corollaries follow from this:

  1. Privileged containers should never be used to run untrusted workloads.
  2. Breakouts from privileged containers are not considered CVEs by our security policy. It still seems a common belief that if we all just try hard enough using privileged containers for untrusted workloads is safe. This is not a promise that can be made good upon. A privileged container is not a security boundary. The reason for this is simply what we looked at above: container_id(0) == host_id(0). It is therefore deeply troubling that this industry is happy to let users believe that they are safe and secure using privileged containers.

Unprivileged Containers as Default

As upstream for LXC and LXD we have been advocating the use of unprivileged containers by default for years. Way ahead before anyone else did. Our low-level library LXC has supported unprivileged containers since 2013 when user namespaces were merged into the kernel. With LXD we have taken it one step further and made unprivileged containers the default and privileged containers opt-in for that very matter: privileged containers aren't safe. We even allow you to have per-container idmappings to make sure that not just each container is isolated from the host but also all containers from each other.

For years we have been advocating for unprivileged containers on conferences, in blogposts, and whenever we have spoken to people but somehow this whole industry has chosen to rely on privileged containers.

The good news is that we are seeing changes as people become more familiar with the perils of privileged containers. Let this recent CVE be another reminder that unprivileged containers need to be the default.

Are LXC and LXD affected?

I have seen this question asked all over the place so I guess I should add a section about this too:

  • Unprivileged LXC and LXD containers are not affected.

  • Any privileged LXC and LXD container running on a read-only rootfs is not affected.

  • Privileged LXC containers in the definition provided above are affected. Though the attack is more difficult than for runC. The reason for this is that the lxc-attach binary does not exit before the program in the container has finished executing. This means an attacker would need to open an O_PATH file descriptor to /proc/self/exe, fork() itself into the background and re-open the O_PATH file descriptor through /proc/self/fd/<O_PATH-nr> in a loop as O_WRONLY and keep trying to write to the binary until such time as lxc-attach exits. Before that it will not succeed since the kernel will not allow modification of a running binary.

  • Privileged LXD containers are only affected if the daemon is restarted other than for upgrade reasons. This should basically never happen. The LXD daemon never exits so any write will fail because the kernel does not allow modification of a running binary. If the LXD daemon is restarted because of an upgrade the binary will be swapped out and the file descriptor used for the attack will write to the old in-memory binary and not to the new binary.

Chromebooks with Crostini using LXD are not affected

Chromebooks use LXD as their default container runtime are not affected. First of all, all binaries reside on a read-only filesystem and second, LXD does not allow running privileged containers on Chromebooks through the LXD_UNPRIVILEGED_ONLY flag. For more details see this link.

Fixing CVE-2019-5736

To prevent this attack, LXC has been patched to create a temporary copy of the calling binary itself when it attaches to containers (cf.6400238d08cdf1ca20d49bafb85f4e224348bf9d). To do this LXC can be instructed to create an anonymous, in-memory file using the memfd_create() system call and to copy itself into the temporary in-memory file, which is then sealed to prevent further modifications. LXC then executes this sealed, in-memory file instead of the original on-disk binary. Any compromising write operations from a privileged container to the host LXC binary will then write to the temporary in-memory binary and not to the host binary on-disk, preserving the integrity of the host LXC binary. Also as the temporary, in-memory LXC binary is sealed, writes to this will also fail. To not break downstream users of the shared library this is opt-in by setting LXC_MEMFD_REXEC in the environment. For our lxc-attach binary which is the only attack vector this is now done by default.

Workloads that place the LXC binaries on a read-only filesystem or prevent running privileged containers can disable this feature by passing --disable-memfd-rexec during the configure stage when compiling LXC.

 
Read more...

from mcgrof

The offlineimap woes

A long term goal I've had for a while now was finding a reasonable replacement for offlineimap to get all my email for my development purposes. I knew offlineimap kept dying on me with out of memory (OOM) errors however it was not clear how bad the issue was. It was also not clear what I'd replace it with until now. At least for now... I've replaced offlineimap with mbsync. Below are some details comparing both, with shiny graphs of system utilization on both, I'll provide my recipes for fetching gmail nested labels over IMAP, glance over my systemd user unit files and explain why I use them, and hint what I'm asking Santa for in the future.

System setup when home is $HOME

I used to host my mail fetching system at home, however, $HOME can get complicated if you travel often, and so for more flexibility I rely now on a digital ocean droplet with a small dedicated volume pool for storage for mail. This lets me do away with the stupid host whenever I'm tired of it, and lets me collect nice system utilization graphs without much effort.

Graphing use on offlineimap

Every now and then I'd check my logs and see how offlineimap tends to run out of memory, and would tend to barf. A temporary solution I figure would work was to disable autorefresh, and instead run offlineimap once in a controlled timely loop using systemd unit timers. That solution didn't help in the end. I finally had a bit of time to check my logs carefully and also check system utilization graphs on the sytem over time and to my surprise offlineimap was running out of memory every single damn time. Here's what I saw from results of running offlineimap for a full month:

Full month graph of offlineimap

Those spikes are a bit concerning, it's likely the system running out of memory. But let's zoom in to see how often with an hourly graph:

Hourly graph of offlineimap

Pretty much, I was OOM'ing every single damn time! The lull you see towards the end was me just getting fed up and killing offlineimap until I found a replacement.

The OOM risks

Running out of memory every now and then is one thing, but every single time is just insanity. A system always running low on memory while doing writes is an effective way to stress test a kernel, and if the stars align against you, you might even end up with a corrupted filesystem. Fortunately this puny single threaded application is simple enough so I didn't run into that issue. But it was a risk.

mbsync

mbsync is written in C, actively maintained and has mutt code pedigree. Need I say more? Hell, I'm only sad it took me so long to find out about it. mbsync works with idea of channels, for each it would have a master and local store. The master is where we fetch data from, and the local where we stash things locally.

But in reading its documentation it was not exactly clear how I'd use it for my development purpose to fetch email off of my gmail where I used nested labels for different public mailing lists.

The documentation was also not clear on what to do when migrating and keeping old files.

mbsync migration

Yes in theory you could keep the old IMAP folder, but in practice I ran into a lot of issues. So much so, my solution to the problem was:

$ rm -rf Mail/

And just start fresh... Afraid to make the jump due to the amount of time it may take to sync one of your precious labels? Well, evaluate my different timer solution below.

mbsync for nested gmail labels

Here's what I ended up with. It demos getting mail to say my linux-kernel/linux-xfs and linux-kernel/linux-fsdevel mailing lists, and includes some empirical throttling to ensure you don't get punted by gmail for going over some sort of usage quota they've concocted for an IMAP connection.

# A gmail example
#
# First generic defaults
# This example was updated on 2021-05-27 to account
# for the isync rename of Master/Slave for Far/Near
Create Near
SyncState *

IMAPAccount gmail
SSLType IMAPS
Host imap.gmail.com
User user@gmail.com
# Must be an application specific password, otherwise google will deny access.
Pass example
# Throttle mbsync so we don't go over gmail's quota: OVERQUOTA error would
# eventually be returned otherwise. For more details see:
# https://sourceforge.net/p/isync/mailman/message/35458365/
# PipelineDepth 50

MaildirStore gmail-local
# The trailing "/" is important
Path ~/Mail/
Inbox ~/Mail/Inbox
Subfolders Verbatim

IMAPStore gmail-remote
Account gmail

# emails sent directly to my kernel.org address
# are stored in my gmail label "korg"
Channel korg
Far :gmail-remote:"korg"
Near :gmail-local:korg

# An example of nested labels on gmail, useful for large projects with
# many mailing lists. We have to flatten out the structure locally.
Channel linux-xfs
Far :gmail-remote:"linux-kernel/linux-xfs"
Near :gmail-local:linux-kernel.linux-xfs

Channel linux-fsdevel
Far :gmail-remote:"linux-kernel/linux-fsdevel"
Near :gmail-local:linux-kernel.linux-fsdevel

# Get all the gmail channels together into a group.
Group googlemail
Channel korg
Channel linux-xfs
Channel linux-fsdevel

mbsync systemd unit files

Now, some of these mailing lists (channels in mbsync lingo) have heavy traffic, and I don't need to be fetching email off of them that often. I also have a channel dedicated solely for emails sent directly to me, those I want right away. But also... since I'm starting fresh, if I ran mbsync to fetch all my email it would mean that at one point mbsync would stall for any large label I'd have. I'd have to wait for those big labels before getting new email for smaller labels. For this reason, ideally I 'd want to actually call mbsync at different intervals depending on the mailing list / mbsync channel. Fortunately mbsync locks per target local directory, and so the only missing piece was a way to configure timers / calls for mbsync in such a way I could still journal calls / issues.

I ended up writing a systemd timer and a service unit file per mailing list. The nice thing about this, in favor over using good 'ol cron, is OnUnitInactiveSec=4m, for instance will call mbsync 4 minutes after it last finished. I also end up with a central place to collect logs:

journalctl --user

Or if I want to monitor:

journalctl --user -f

For my korg label, patches / rants sent directly to me, I want to fetch mail every minute:

$ cat .config/systemd/user/mbsync-korg.timer
[Unit]
Description=mbsync query timer [0000-korg]
ConditionPathExists=%h/.mbsyncrc

[Timer]
OnBootSec=1m
OnUnitInactiveSec=1m

[Install]
WantedBy=default.target

$ cat .config/systemd/user/mbsync-korg.service
[Unit]
Description=mbsync service [korg]
Documentation=man:mbsync(1)
ConditionPathExists=%h/.mbsyncrc

[Service]
Type=oneshot
ExecStart=/usr/local/bin/mbsync 0000-korg

[Install]
WantedBy=mail.target

However for my linux-fsdevel... I could wait at least 30 minutes for a refresh:

$ cat .config/systemd/user/mbsync-linux-fsdevel.timer
[Unit]
Description=mbsync query timer [linux-fsdevel]
ConditionPathExists=%h/.mbsyncrc

[Timer]
OnBootSec=5m
OnUnitInactiveSec=30m

[Install]
WantedBy=default.target

And the service unit:

$ cat .config/systemd/user/mbsync-linux-fsdevel.service
[Unit]
Description=mbsync service [linux-fsdevel]
Documentation=man:mbsync(1)
ConditionPathExists=%h/.mbsyncrc

[Service]
Type=oneshot
ExecStart=/usr/local/bin/mbsync linux-fsdevel

[Install]
WantedBy=mail.target

Enabling and starting systemd user unit files

To enable these unit files I just run for each, for instance for linux-fsdevel:

# The first command is now required on more recent versions
# of systemd. Only older versions of systemd
# you just need to enable the timer and start it
systemctl --user enable mbsync-linux-fsdevel.service
systemctl --user enable mbsync-linux-fsdevel.timer
systemctl --user start  mbsync-linux-fsdevel.timer

Graphing mbsync

So... how did it do?

I currently have enabled 5 mbsync channels, all fetching my email in the background for me. And not a single one goes on puking with OOM. Here's what life is looking like now:

mbsync hourly

Peachy.

Long term ideals

IMAP does the job for email, it just seems utterly stupid for public mailing lists and I figure we can do much better. This is specially true in light of the fact of how much simpler it is for me to follow public code Vs public email threads these days. Keep in mind how much more complicated code management is over the goal of just wanting to get a simple stupid email Message ID onto my local Maildir directory. I really had my hopes on public-inbox but after looking into it, it seems clear now that its main objectives are for archiving — not local storage / MUA use. For details refer to this linux-kernel discussion on public-inbox with a MUA focus.

If the issue with using public-inbox for local MUA usage was that archive was too big... it seems sensible to me to evaluate trying an even smaller epoch size, and default clients to fetch only one epoch, the latest one. That alone wouldn't solve the issue though. How data files are stored on Maildir makes using git almost incompatible. A proper evaluation of using mbox would be in order.

The social lubricant is out on the idea though, and I'm in hopes a proper simple git Mail solution is bound to find us soon for public emails.

 
Read more...

from Greg Kroah-Hartman

As everyone seems to like to put kernel trees up on github for random projects (based on the crazy notifications I get all the time), I figured it was time to put up a “semi-official” mirror of all of the stable kernel releases on github.com

It can be found at: https://github.com/gregkh/linux

It differs from Linus's tree at: https://github.com/torvalds/linux in that it contains all of the different stable tree branches and stable releases and tags, which many devices end up building on top of.

So, mirror away!

Also note, this is a read-only mirror, any pull requests created on it will be gleefully ignored, just like happens on Linus's github mirror.

 
Read more...

from Benson Leung

tl;dr: There are 6, it's unfortunately very confusing to the end user.

Classic USB from the 1.1, 2.0, to 3.0 generations using USB-A and USB-B connectors have a really nice property in that cables were directional and plugs and receptacles were physically distinct to specify a different capability. A USB 3.0 capable USB-B plug was physically larger than a 2.0 plug and would not fit into a USB 2.0-only receptacle. For the end user, this meant that as long as they have a cable that would physically connect to both the host and the device, the system would function properly, as there is only ever one kind of cable that goes from one A plug to a particular flavor of B plug.

Does the same hold for USB-C™?

Sadly, the answer is no. Cables with a USB-C plug on both ends (C-to-C), hitherto referred to as “USB-C cables”, come in several varieties. Here they are, current as of the USB Type-C™ Specification 1.4 on June 2019:

  1. USB 2.0 rated at 3A
  2. USB 2.0 rated at 5A
  3. USB 3.2 Gen 1 (5gbps) rated at 3A
  4. USB 3.2 Gen 1 (5gbps) rated at 5A
  5. USB 3.2 Gen 2 (10gbps) rated at 3A
  6. USB 3.2 Gen 2 (10gpbs) rated at 5A

We have a matrix of 2 x 3, with 2 current rating levels (3A max current, or 5A max current), and 3 data speeds (480mbps, 5gbps, 10gpbs).

Adding a bit more detail, cables 3-6, in fact, have 10 more wires that connect end-to-end compared to the USB 2.0 ones in order to handle SuperSpeed data rates. Cables 3-6 are called “Full-Featured Type-C Cables” in the spec, and the extra wires are actually required for more than just faster data speeds.

“Full-Featured Type-C Cables” are required for the most common USB-C Alternate Mode used on PCs and many phones today, VESA DisplayPort Alternate Mode. VESA DP Alt mode requires most of the 10 extra wires present in a Full-Featured USB-C cable.

My new Pixelbook, for example, does not have a dedicated physical DP or HDMI port and relies on VESA DP Alt Mode in order to connect to any monitor. Brand new monitors and docking stations may have a USB-C receptacle in order to allow for a DisplayPort, power and USB connection to the laptop.

Suddenly, with a USB-C receptacle on both the host and the device (the monitor), and a range of 6 possible USB-C cables, the user may encounter a pitfall: They may try to use the USB 2.0 cable that came with their laptop with the display and the display doesn't work, despite the plugs fitting on both sides because 10 wires aren't there.

Why did it come to this? This problem was created because the USB-C connectors were designed to replace all of the previous USB connectors at the same time as vastly increasing what the cable could do in power, data, and display dimensions. The new connector may be and virtually impossible to plug in improperly (no USB superposition problem, no grabbing the wrong end of the cable), but sacrificed for that simplicity is the ability to intuitively know whether the system you've connected together has all of the functionality possible. The USB spec also cannot simply mandate that all USB-C cables have the maximum number of wires all the time because that would vastly increase BOM cost for cases where the cable is just used for charging primarily.

How can we fix this? Unfortunately, it's a tough problem that has to involve user education. USB-C cables are mandated by USB-IF to bear a particular logo in order to be certified:

Image

Collectively, we have to teach users that if they need DisplayPort to work, they need to find cables with the two logos on the right.

Technically, there is something that software can do to help the education problem. Cables 2-6 are required by the USB specification to include an electronic marker chip which contains vital information about the cable. The host should be able to read that eMarker, and identify what its data and power capabilities are. If the host sees that the user is attempting to use DisplayPort Alternate Mode with the wrong cable, rather than a silent failure (ie, the external display doesn't light up), the OS should tell the user via a notification they may be using the wrong cable, and educate the user about cables with the right logo.

This is something that my team is actively working on, and I hope to be able to show the kernel pieces necessary soon.

 
Read more...

from Mauro Carvalho Chehab

Having a certain number of machines here with Fedora, I started working on April, 30 with the migration of those to use Fedora’s latest version: Fedora 30.

Note: this is a re-post of a blog entry I wrote back on May, 1st: https://linuxkernel.home.blog/2019/05/01/fedora-30-installation/ with one update at the end made on Jun, 26.

First machine: a multi-monitor desktop

I started the migration on a machine with multiple monitors connected on it. Originally, when Fedora was installed on it, the GPU Kernel driver for the chipset (called DRM KMS – Kernel ModeSet) was not available yet at Fedora’s Kernel. So, Fedora installer (Anaconda) added a nomodeset option to the Kernel parameters.

As there was KMS support was just arriving upstream, I built my own Kernel on that time and removed the nomodeset option.

By the time I did the upgrade, maybe except for the rescue mode, all Kernels were using KMS.

I did the upgrade the same way I did in the past (as described here), e. g. by calling:

dnf system-upgrade --release 30 --allowerasing download
dnf system-upgrade reboot

The system-upgrade had to remove pgp-tools, with currently has a broken dependency, and eclipse. The last one was due to the fact that, on Fedora 29, I was with modular support enabled, with made it depend on a Java modular set of packages.

After booting the Kernel, I had the first problem with the upgrade: Fedora now uses BootLoaderSpec – BLS by default, converting the old grub.cfg file to the new BLS mode. Well, the conversion simply re-added the nomodeset option to all Kernels, causing it to disable the extra monitors, as X11/Wayland would need to setup the video mode via the old way. On that time, I wasn’t aware of BLS, so I just ran this command:

cd /boot/efi/EFI/fedora/ && cp grub.cfg.rpmsave grub.cfg

In order to restore the working grub.cfg file.

Later, in order to avoid further problems on Kernel upgrades, I installed grubby-deprecated, as recommended at https://fedoraproject.org/wiki/Changes/BootLoaderSpecByDefault#Upgrade.2Fcompatibility_impact, and manually edited /etc/default/grub in order to comment out the line with GRUB_ENABLE_BLSCFG. I probably could just fix the BLS setup instead, but I opted to be conservative here.

After that, I worked to re-install eclipse. For that, I had to disable modular support, as eclipse depends on an ant package version that was not there yet inside Fedora modular repositories by the time I did the upgrade.

In summary, my first install didn’t went smoothly.

Second machine: a laptop

At the second machine, I ran the same dnf system-upgrade commands as did at the first machine. As this laptop had a Fedora 29 installed last month from scratch, I was expecting a better luck.

Guess what…

… it ended to be an even worse upgrade… machine crashed after boot!

Basically, systemd doesn’t want to mount a rootfs image if it doesn’t contain a valid file at /usr/lib/os-release. On Fedora 29, this is a soft link to another file inside /usr/lib/os.release.d. The specific file name depends if you installed Fedora Workstation, Fedora Server, …

During the upgrade, the directory /usr/lib/os.release.d got removed, causing the soft link to point to nowhere. Due to that, after boot, systemd crashes the machine with a “brilliant” message, saying that it was generating a rdsosreport.txt, crowded of information that one would need to copy to some place else in order to analyze. Well, as it didn’t mount the rootfs, copying it would be tricky, without network nor the usual commands found at /bin and /sbin directories.

So, instead, I just looked at the journal file, where it said that the failure was at /lib/systemd/system/initrd-switch-root.service. That basically calls systemctl, asking it to switch the rootfs to /sysroot (with is the root filesystem as listed at /etc/fstab). Well, systemctl checks if it recognizes os-release. If not, instead of mounting it, producing a warning and hoping for the best, it simply crashes the system!

In order to fix it, I had to use vi to manually create a Fedora 30 release. Thankfully, I had already a valid os-release from my first upgraded machine. So, I just manually typed it.

After that, the system booted smoothly.

Other machines

Knowing that Fedora 30 install was not trivial, I decided to go one step back, learning from my past mistakes.

So, I decided to write a small “script” with the steps to be done for the upgrade. Instead of running it as a script, you may instead run it line by line (after the set -e line). Here it is:

#/bin/bash

#should run as root

# If one runs it as a script, makes it abort on errors
set -e

dnf config-manager --set-disabled fedora-modular
dnf config-manager --set-disabled updates-modular
dnf config-manager --set-disabled updates-testing-modular
dnf distro-sync
dnf upgrade --refresh
(cd /usr/lib/ && cp $(readlink -f os-release) /tmp/os-release && rm os-release && cp /tmp/os-release os-release)
dnf system-upgrade --release 30 --allowerasing download
dnf system-upgrade reboot

Please notice that the scripts will removes os-release and copies the one from the linked file. Please check if it went well, as if the logic fails, you may end crashing your machine at the next boot.

Also, please notice that it will disable Fedora modular support. Well, I don’t need anything there, so it works pretty fine for me.

Post-install steps

Please notice that, after an upgrade, Fedora may re-enable Fedora modular. That happened to me on one machine with had Fedora 26. If you don't want to keep it enabled, you should do:

dnf config-manager --set-disabled fedora-modular
dnf config-manager --set-disabled updates-modular
dnf config-manager --set-disabled updates-testing-modular
dnf distro-sync

Results

I repeated the same procedure on several other machines, one being a Fedora Server, using the above scripts. On all, it went smoothly.

 
Read more...